
A Minecraft slime chunk finder answers a very specific question before you start digging: which 16×16 chunks in this Java world can spawn slimes underground? Enter the same numeric seed used by your world and MC Seed Map highlights every matching chunk over the biome map. You can then compare candidates near your base, find a useful cluster, and plan a farm without excavating random test rooms.
The finder runs in your browser and uses the Java Edition slime-chunk calculation. The green overlay does not mean slimes will appear immediately; it identifies chunks where they can spawn below Y=40 when the normal mob-spawning conditions are met.
Find slime chunks for your Java seed
Open the map with the Slime Chunks layer enabled, paste your world seed, and zoom in around the place where you want to build.
Open the Slime Chunk Map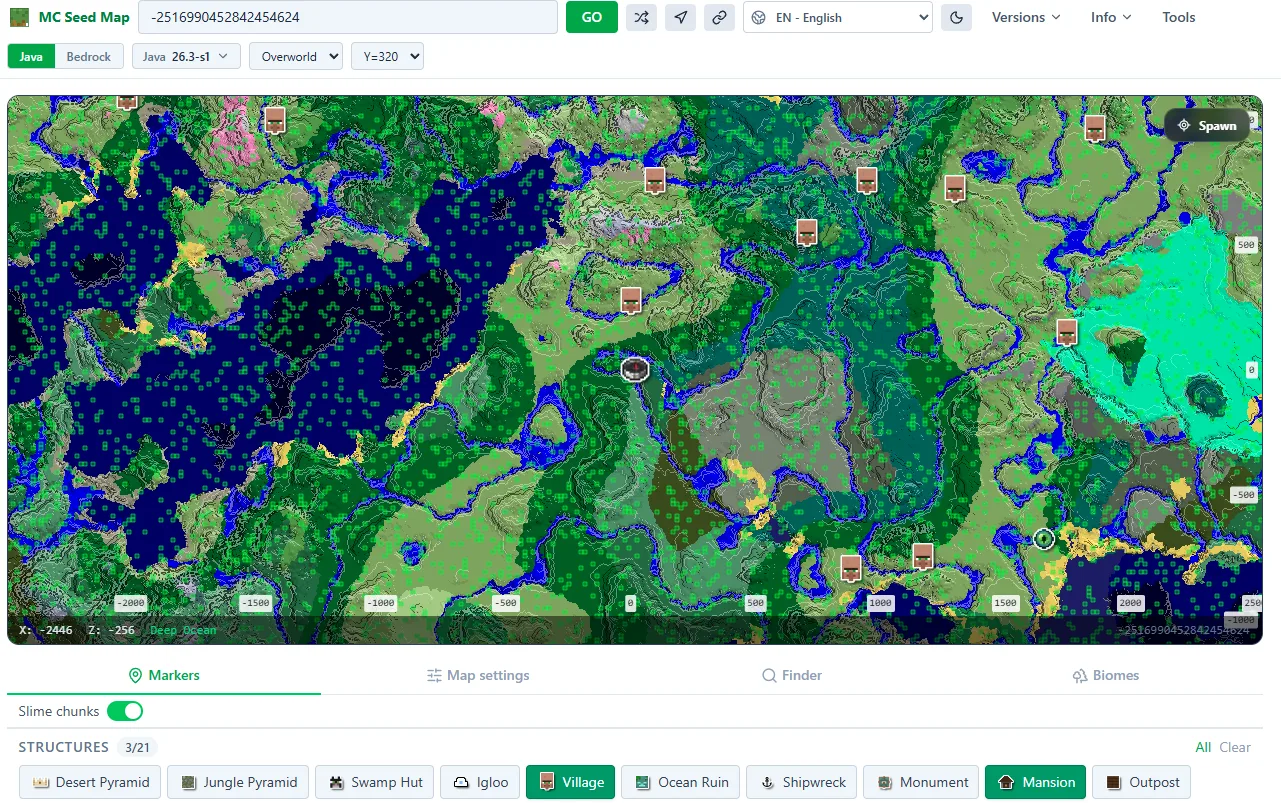
How to Use the Slime Chunk Finder
- Open your Java world and copy its complete seed. The
/seedcommand is the safest source when you have permission to use it. - Open the Java slime chunk map, paste the seed into the field at the top, and press GO.
- Keep the dimension set to Overworld. Open Markers and switch on Slime chunks if the shared link did not already enable it.
- Move to your base coordinates and zoom in until individual green 16×16 squares are easy to distinguish.
- Choose one chunk or a nearby group of chunks, confirm its borders in Java with F3+G, and build the spawning floors below Y=40.
You can leave villages, monuments, outposts, and other useful markers on while scouting. This makes the finder more useful than a blank chunk grid: it shows whether a possible slime farm is convenient for the rest of your survival plans.
What the Green Squares Mean
Minecraft divides the world into chunks that are 16 blocks wide and 16 blocks long. In Java Edition, the game combines the world seed with each chunk's X and Z coordinates and performs a deterministic random check. Roughly one chunk in ten passes. The result looks random on the map, but the same Java seed always produces the same slime-chunk layout.
A highlighted square covers the whole horizontal footprint of that chunk. If its chunk coordinates are cx and cz, its block range begins at cx × 16 and cz × 16, then ends 15 blocks later on each axis. Using F3+G in Java is easier than doing that arithmetic by hand and prevents a farm platform from drifting into a neighboring non-slime chunk.
The selected Minecraft version still matters to the terrain, biomes, and structure markers behind the overlay. The Java slime-chunk test itself is seed- and coordinate-based, so changing between supported Java versions should not move those green squares for the same numeric seed.
How to Choose a Good Slime Farm Location
The nearest slime chunk is not automatically the best one. A practical farm site should be easy to reach, simple to excavate, and far enough from busy underground areas that nearby hostile mobs do not consume the mob cap. Use the map to shortlist locations before checking them in game.
- Start near your base: pan to its X and Z coordinates instead of choosing the first green square around world spawn.
- Look for clusters: two or more nearby slime chunks provide room for a larger project, although a single chunk is enough for many survival farms.
- Check access: an ocean, mountain, or deep cave can change how much work the excavation and collection system requires.
- Consider the mob cap: caves and dark spaces around the farm can host other monsters and reduce slime rates.
- Verify before a large build: expose the Java chunk border and test a modest spawning floor before excavating several complete chunks.
Slime Chunk Spawning Rules That Still Matter
A correct location is only the first part of a working farm. In a Java slime chunk, the spawning position must be below Y=40, meaning Y=39 or lower. Light does not disqualify a slime-chunk spawn, so lighting the platforms can help suppress other hostile mobs while leaving slime spawning possible.
Slimes also need enough empty space for their size, a suitable solid floor, and a player within the game's active spawning range. Standing directly beside the platform can stop natural hostile-mob spawning because it is too close; standing too far away can leave the area inactive. On servers, simulation distance, mob caps, plugins, and other players can change the results.
Do not confuse underground slime-chunk spawning with surface swamp spawning. Swamp slimes follow a separate set of biome, height, light, and moon conditions. The green map cells specifically describe the underground slime-chunk mechanic.
Java and Bedrock Slime Chunks Are Different
Java slime chunks depend on the world seed. Bedrock Edition uses a different fixed pattern based on chunk coordinates, so all Bedrock worlds share the same slime-chunk layout. A Java green square is therefore not evidence that the same position is a slime chunk in Bedrock.
MC Seed Map currently exposes the Slime Chunks overlay for Java Edition in the Overworld. This guide deliberately does not label Java results as Bedrock results. If you switch editions or dimensions, the overlay is turned off to avoid mixing incompatible rules.
Why Slimes May Not Spawn Even in the Right Chunk
First, confirm the seed exactly. A missing minus sign creates a completely different Java slime map. Then verify that the green cell and your excavation occupy the same chunk, including at negative coordinates. Finally, check the farm rather than the finder: height, spawning space, player distance, surrounding caves, mob caps, peaceful difficulty, and server configuration can all prevent visible results.
If you are testing a new location, begin with one well-lit platform below Y=40 and wait from a valid AFK position. A small successful test is much cheaper than finishing a multi-layer farm in the wrong place.
Minecraft Slime Chunk Finder FAQ
How accurate is the MC Seed Map slime chunk finder?
The Java overlay uses Minecraft's seed-and-chunk calculation with signed 64-bit seed handling. Its output has also been checked against a Java reference implementation. Select Java Edition and enter the complete numeric seed, including a leading minus sign when present.
What percentage of chunks are slime chunks?
About 10 percent of Java chunks pass the check. This is a long-run average, not a promise that every group of ten chunks contains exactly one.
At what Y level do slimes spawn in slime chunks?
Use Y=39 or lower. The slime-chunk condition applies below Y=40, while all other mob-spawning requirements still matter.
Does the finder need my world file?
No. The map needs only the Java seed and calculates the overlay locally in your browser. You do not need to upload a world save or install a mod.
Does it support Bedrock Edition?
Not yet. The current MC Seed Map overlay is Java-only because Bedrock uses a different seed-independent pattern.
Find a Chunk, Then Verify It in Game
The fastest workflow is simple: use the map to remove the guesswork, choose a green chunk that fits your base and travel plans, then confirm its border and spawning conditions in Minecraft. Start with the Minecraft slime chunk finder, or review how Minecraft coordinates work before laying out the farm.